If you've tried upgrading from iis6 to iis7 using an old version of Telerik's upload progress control you've probably experienced an internal server 500 error message.
I contacted Telerik to ask what could be done or how to adjust the web.config accordingly, however they replied "The “classic” RadProgressArea does not work in IIS7. Please upgrade to RadUpload for ASP.NET AJAX." Great!
However its actually really simple to get it to work. See below.
Leave
<httpModules>
<add name="RadUploadModule" type="Telerik.WebControls.RadUploadHttpModule, RadUpload.Net2" />
</httpModules>
<httpHandlers>
<add verb="*" path="Telerik.RadUploadProgressHandler.aspx" type="Telerik.WebControls.RadUploadProgressHandler, RadUpload.Net2"></add>
</httpHandlers>
Add the following to the Sytem.WebServer element
<modules>
<add name="RadUploadModule" type="Telerik.WebControls.RadUploadHttpModule, RadUpload.Net2" />
</modules>
<handlers>
<add name="TelerikRadProgress" preCondition="integratedMode" path="Telerik.RadUploadProgressHandler.aspx" verb="*" type="Telerik.WebControls.RadUploadProgressHandler, RadUpload.Net2" />
</handlers>
<validation validateIntegratedModeConfiguration="false" />
Friday, December 5, 2008
Monday, December 1, 2008
New Zealand Google StreetView Launched!
Google has after much anticipation launched Google streetview in New Zealand. Lucky for me my front driveway actually looks mown! Who said I spend too much time on my computer :).
My general gist is its looks like the Australian streetview (surprise surprise), zooming in produces imagery which is very low resoltuion which kinda sucks but then you'd have the hassle of preying eyes into peoples windows.
I've also seen a few peoples faces which i presume will be blurred out in the coming weeks.
All in all lets thank Google for bring streeview to New Zealand, its certainly going to be another useful tool for searching real estate in New Zealand.
Wednesday, October 15, 2008
USPS Shipping Provider for dashCommerce
Download the install files from here.
===================================
What is the USPS Shipping Provider?
===================================
The USPS Shipping Provider for dashCommerce allows for real time calculation of shipping rates when a user checks out their order. The provider uses the Domestic Rates API (V3). Details of the API can be found here. Currently only domestic (US -> US) calculations are possible, international coming soon.
=============================
How Do I Install The Provider
=============================
In the Zip file you have downloaded there are three files (SKILTZ.DLL, USPSsetup.aspx and uspsconfiguration.ascx).
Copy these files to their appropriate location as specified in structure of the zip files.
Browse to http://yoursite.com/admin/USPSSetup.aspx and press the install button.
****NO existing pages on dashCommerce are modified so the install should be safe use with any pre-existing pages you have modified*********************
===============================
How do I configure the Provider
===============================
By going to "Manage Shipping Providers" is dashCommerce you can setup the provider, you will need to obtain a API from USPS, you can get this from here.
*****Please note the USPS testing server is not configured to allow testing of the Rate V3 API. I requested access to production environment and advised I only needed access to this API and there more than happy to give me access to the production environment (can't say the same for some other postal companies they won't even give me access to their testing system without a valid customerID).
==============================
What if I have problems?
==============================
Please email mskiltonATgmail.com I'm more than happy to help.
==============================
Got anything else cool?
==============================
You can also use the USPS shipping provider to allow for flat rate shipping. There are 3 flat rate configuration options.
- Flat Rate Per Order
- Flat Rate Per Unique Item
- Flat Rate Per Item.
===================================
What is the USPS Shipping Provider?
===================================
The USPS Shipping Provider for dashCommerce allows for real time calculation of shipping rates when a user checks out their order. The provider uses the Domestic Rates API (V3). Details of the API can be found here. Currently only domestic (US -> US) calculations are possible, international coming soon.
=============================
How Do I Install The Provider
=============================
In the Zip file you have downloaded there are three files (SKILTZ.DLL, USPSsetup.aspx and uspsconfiguration.ascx).
Copy these files to their appropriate location as specified in structure of the zip files.
Browse to http://yoursite.com/admin/USPSSetup.aspx and press the install button.
****NO existing pages on dashCommerce are modified so the install should be safe use with any pre-existing pages you have modified*********************
===============================
How do I configure the Provider
===============================
By going to "Manage Shipping Providers" is dashCommerce you can setup the provider, you will need to obtain a API from USPS, you can get this from here.
*****Please note the USPS testing server is not configured to allow testing of the Rate V3 API. I requested access to production environment and advised I only needed access to this API and there more than happy to give me access to the production environment (can't say the same for some other postal companies they won't even give me access to their testing system without a valid customerID).
==============================
What if I have problems?
==============================
Please email mskiltonATgmail.com I'm more than happy to help.
==============================
Got anything else cool?
==============================
You can also use the USPS shipping provider to allow for flat rate shipping. There are 3 flat rate configuration options.
- Flat Rate Per Order
- Flat Rate Per Unique Item
- Flat Rate Per Item.
Wednesday, October 8, 2008
Zero Payment Provider for dashCommerce
Below are some instructions on how to add a ZeroPaymentProvider to your exsisting dashCommerce installaton. This is still in very early stages and I need some people to test it, recommend changes etc. It currently only works with PayPalStandard but will be added to PayPal Express after some people have provided feedback.
I suggest making all these changes in a TESTING environment first, maybe sure a backup is taken before making any changes.
SNEAK PEAK.

1. Copy ZeroPaymenyProvider.cs to > store > services > Payment Service
This class does basically nothing other than allows to hold a description which we will use after this initial release.
2. Overwrite checkout.aspx.cs, paypalcheckout.aspx, paypalcheckout.aspx.cs and paypalcheck.aspx.designer.cs
With any luck hopefully you haven't made any previous changes to these files. checkout.aspx.cs basically is just adding another line of code and all 3 PayPalChekout file have been extensively modified to allow for the new accordion pane.
3. Copy the 3 ZeroPaymentConfiguration files to Web > Admin > Controls > Configuration > Payment Providers
4.Add these resources to Labels.resx or if made no previsous modification just copy the one over in the zip file
hlZeroPaymentHelp - This will be a description that is displayed to the customer.
lblZeroPayment - Description for Customer:
lblZeroPaymentDescriptionTitle - Zero Payment
pnlZeroPaymentConfiguration - Zero Payment Conifguration
rfvZeroPayment - This field is required.
5. Overwrite Store/ Enumerations.cs with one in zip file. Adds 1 more enumeration
6. Add a single entry to database
INSERT INTO dashCommerce_Store_OrderStatusDescriptor
(OrderStatusId, Name, CreatedBy, ModifiedBy)
VALUES (700,'Pay On Pickup','SYSTEM','SYSTEM')
7. Build Project and Deploy/Publish Website.
8. Login to admin control panel
Go to Configuration > Payment Providers > Manage Payment Providers
Fill in fields:
Name: ZeroPaymentProvider
Description: Whatever you want
Configuration Control Path: ~/admin/controls/configuration/paymentproviders/zeropaymentconfiguration.ascx
Go to Configuration > Payment Providers > Configure Payment Providers
Fill in the appropaite fields. If you only configure 1 provider then the accordion pane "Payment Method" will not be showne when making an order. Therefore if you want to see the accordion pane then make sure you configure both the Zero Payment Provider and the PayPal Standard Provider.
We will need to do something about the names but this just fixed after some testing and feedback has been completed.
The files you need can be downloaded from:
http://www.trading.co.nz/media/482/zeropaymentprovider.zip
Thanks,
Matthew
Tuesday, September 30, 2008
Paymate Payment Provider for Dash Commerce
Paymate (http://www.paymate.com) is a popular payment gateway in New Zealand and Australia and therefore have create a Payment Provider for Dash Commerce (http://www.dashcommerce.org)
Paymate is very similar to Pay Pay Express i.e uses HTTP Post to make payments and there for a lot of the code is based off the Pay Pal Standard Payment Provider in some situations we have just added to the file already in Dash Commerce in order to not duplication content. For example the checkout page uses the PayPalCheckOut.aspx page.
You can obviously switch backwards and forwards to which ever payment provider you wish to use, we have not altered the PayPal Standard provider in way in which it will now not work.
Below are some installation instructions, you will also find these then installation zip folder. You will require Visual Studio in order to complete installation.
================================
INSTALL INSTRUCTIONS
================================
1. Copy the 3 files in the paymatestandardconfiguration folder to Web\admin\controls\configuration\paymentproviders and include them in your project
2. Copy the 3 files in the PaymateHandler directory to web\paypal
3. Add a reference in your Web project to PayMateStandardPaymentProvider.dll
4. Add the following resource strings in Labels.resx in the Localization project
pnlPayMateStandardConfiguration
lblPayMateStandardDescriptionTitle
lblUserID
hluserid
5. Change checkout.aspx.cs - Line 124
FROM:
if(paymentService.PaymentServiceSettings.DefaultProvider == "PayPalStandardPaymentProvider") {
Response.Redirect("~/paypalcheckout.aspx", true);
}
TO:
if (paymentService.PaymentServiceSettings.DefaultProvider == "PayPalStandardPaymentProvider" || paymentService.PaymentServiceSettings.DefaultProvider == "PayMateProvider")
{
Response.Redirect("~/paypalcheckout.aspx", true);
}
6. Change the following in paypalcheckout.aspx.cs -
add this at the top of page line 90 or so.
using MettleSystems.dashCommerce.Store.Services.PaymentService;
line 423 and 424 change the following
FROM:
string returnUrl = Utility.GetSiteRoot() + "/paypal/pdthandler.aspx";
string cancelUrl = Utility.GetSiteRoot() + "/paypalcheckout.aspx";
TO:
string returnUrl = "";
string cancelUrl = "";
PaymentService paymentService = new PaymentService();
if (paymentService.PaymentServiceSettings.DefaultProvider == "PayPalStandardPaymentProvider" )
{
returnUrl = Utility.GetSiteRoot() + "/paypal/pdthandler.aspx";
cancelUrl = Utility.GetSiteRoot() + "/paypalcheckout.aspx";
}
else if (paymentService.PaymentServiceSettings.DefaultProvider == "PayMateProvider")
{
returnUrl = Utility.GetSiteRoot() + "/paypal/paymateHandler.aspx";
}
7. Build Project
8. Login to the control panel and go to manage payment providers
-add new provider with the following details
-name: PaymateStandardProvider
-description: A description
-Configuration Control Path: ~/admin/controls/configuration/paymentproviders/PaymateStandardConfiguration.ascx
9. Goto configure Payment provider and fill in the appropriate text boxes.
tick live to use live Url untick to use sandBox url.
10. TEST!
Install Files
Sunday, June 22, 2008
My First Facebook Application
Today I published my first facebook application using the asp.net Facebook Developer Toolkit. You can check out my application here. Basically the application plots all of your friends on a google map, either using their homelocation or current location which is pulled from your friends facebook profile. Have a look and let me know any improvments that could be made. I'm now off to look for a new facebook application idea.
Thursday, June 12, 2008
Web Service Code Generator + Help Needed!
Wanting to return datasets or datatables from webservice to Crystal Xcelsius?? I have the solution.
I am currently looking for some people to test my Web Service code generator, if anyone has a spare 15 minutes you can download it from http://agentx.info/webservicegeneratorsetup.msi
btw I built trading.co.nz in about 30 minutes with Umbraco, including adding a contact form and dynamically generating the top navigation bar. Man I love Umbraco!
UPDATE - DOWNLOAD SETUP FILE FROM
http://agentx.info/webservicegeneratorsetup.msi
Sunday, April 27, 2008
Moving from Shared Hosting to a VPS Solutions
I've finally taken and plunge and moved away from a shared hosting environment to a VPS solution. To be honest I've been thinking about doing this for about the last 4 - 5 months and was really concerned that I didn't have a the skills to a) get the server running and b) keeping it running.
To give you some background on my situation I'm a web developer by trade and was basically paying about $100 a month to run all my 15 websites, I wanted to cut costs and have more control, I was sick of emailing my web hosting company asking for changes to my site, also .net web hosting in New Zealand is very expensive. By going to a VPS I had no choice but to move it to an overseas server, I think there were 2 .net vps solutions in New Zealand when I went looking and the specs went something like so $70 for 384mb ram and 3gb of ram. Obviously running a few website on these specs was going to be very limited. One good thing about hosting in New Zealand, obviously websites load faster and support help desks and generally fantastic, I use to have all my websites with Web Drive and they were really awesome.
So taking all these things into account I finally found a company i wanted to list with, basically they has 1gb ram 10gb for $50US a month which I thought was pretty damn good, I proceeded through the checkout and the next day the VPS was up and running.
I now had to start planning moving all my sites (something I wasn't looking forward to, other than it was a good learning experience), first couple of things I did on the server (windows 2003 sp2) was run any upgrades that Microsoft suggested to be installed on a web server, then needed to install the .net 2.0 framework and the 3.5 run time.
One thing that got me really confused to begin with was to install my own DNS or not, I'm still pretty ignorant on this fact, i decided it was too hard and fortunately the registrar where all my domains are registered allows DNS control so one thing less to worry about, I did NOT install active directory even though I also thought I needed it, however it turned out I didn't either. I also installed Microsoft SQL Server Express, I know this is probably pretty bad practice, but my websites don't get huge amount of traffic and so I thought this should be fine, I didn't want to pay for a SQL Server database as well if it wasn't really needed, if I need this later then so be it but at the moment it should be fine.
The only thing really to think about was email (i thought I would have to install active directory to handle multiple domains), i spent hours and hours playing around withe SMTP server built into IIS and the pop3 service, basically it was just to hard or actually now looking back on it, its not that hard it just doesn't have anywhere near the functionality that I needed. I didn't know what to do with email, at one point in time I considered buying a second linux vps with cpanel to handle the email but again another expense I didn't want to have. Eventually i discovered hMailServer I had no idea this open source windows based email server even existed, its absolutely fab I suggest you install it and have a play, read as much as you can and follow instructions, I now have it on my VPS running about 10 different domain emails, it can check for viruses, spam, can forward email, can SMTP into it, just awesome! So that was email taken care of.
Right so I started with www.erealestate.co.nz and this is pretty much how it went.
-FTP files from existing host to new host (installed filezilla server on VPS as well)
-Backup existing database and restore on new VPS
-Create new website in IIS6
- Change website to 2.0
- Add erealestate.co.nz and www.erealestate.co.nz to host headers
-Create email accounts in hMailServer
-Change a records and mx records at registrar to point to the IP address of my VPS
-Cross Fingers
This worked fine and repeated the process for my other domains. So far all is going well, VPS has been stable and i'm saving money, I guess the website aren't quite as fast as they use to be but that it to be expected as they now hosting outside New Zealand.
One last thing I did was write a script that backuped my SQL database and my websites and FTPed them to me each night, they are then restored on my local PC. In terms of backup this is probably all I need right.
If you are thinking about moving to VPS then it's really not as hard as you think, its great fun remote desktoping into your own server, installing programs, looking at logs, just remeber don't install to many program :) not like me! Good luck with you VPSing.
Sunday, April 20, 2008
Mutiple Websites + Umbraco
In this short tutorial we are going to learn how to run multiple websites on one instance of Umbraco, this is fantastic if you have common features that you want share between many sites.
I've you followed my GST user control samples (Part 1 | Part 2)
then you will know I have an unusual obsession with GST and VAT calculators and this tutorial is not going to be any different.
In my quest for value added tax calculator dominance i registered two domain names GSTcalculator.info and VATcalculator.info (mainly cos they were only .99c) and what I plan to do is run the calculator we developed in the User Control sample on both websites but only running 1 instance of Umbraco.
The first thing we needed to do was obviously point both domain names to our web server, I'll take it for granted you know how to do this.
Next we can either add both websites to an existing IIS website or create a new one in this case I've created a new website in IIS called Umbraco, pointed the "home directory" to my Umbraco installation and added host header in IIS as per screen shot below.

Because we are going to have a GST calculator(New Zealand) and a VAT Calculator (United Kingdom) we are going to want to have different regional settings eg $ instead of £. For this reason we need to make sure we have two languages defined.

Next we'ved added two new content pages, you can call these whatever you want, if you going to be running many websites then obvisouly it makes sense to name these something you are going to remeber, probably the easiest thing thing to do is call them their domain name.

Now we need add new hostnames to each of the pages we've just created - right mouse click and select host names

Enter the corresponding hostname make sure you add the www version as well.

We should all be set now - if you browse to each website you should see a different version (if you added some content to each page).
While writing this tutorial once i added the host names, Umbraco was still showing me the default homepage of another website higher in the tree, I tounched the web.config so the application would restart and this fixed the issue.
Hope you all enjoyed this tutorial!
Thursday, April 17, 2008
Creating your first Umbraco User Control - PART 2
In the previous article of this series we learnt how to create a user control in visual studio, upload it to our Umbraco site and then how to display it on our site.
In part 2 we are going to learn how to pass variables from Umbraco back to our User Control.
If you followed part one then great we are going to use the same source code and modify the bits we need to.
Because the New Zealand econonmy has turned to crap and the government is constantly changing the GST rate we'd like to update the GST rate in Umbraco and not in our source code.
1. Open your Umbraco user control in Visual Studio.
2. Last time we had some code like such
This time want to replace this line (double GST = 1.125;) with a dynamic value from Umbraco.
We need create a variable to hold the GST amount eg
private Double gstRate;
3. Next create a public property so we can access it from Umbraco and assign it to the variable we created above. eg
4. Replace double GST = 1.125; with so:
5. Build the soluion and upload to to your Umbraco Bin directory and move to the Umbraco control panel.
6. Go to your developer --> macros and select the Macro you created last time or if you want you can create a new macro.
7. Select the "browse properties" button

8. The public properties in you usercontrol should be displayed in this page

9. Click the parameter tab at the top of the screen and make sure the type selected is text.
10. Save your macro and return to the content page where you are going to place GST Calculator.
11. Insert the macro and you should see the option to input your GST rate.

12. Publish your page and you should be away laughing
13. To edit the rate you can either delete the macro within the page and reinsert it or view the HTML using the html button on the rich text editor and changing the rate manually in their.
Hope you enjoyed this little tutorial - please make any suggestions of tutortial you would like to see! The GST calculator is running live my umbraco site here
You can download a copy of the Visual Studio 2005 version here
In part 2 we are going to learn how to pass variables from Umbraco back to our User Control.
If you followed part one then great we are going to use the same source code and modify the bits we need to.
Because the New Zealand econonmy has turned to crap and the government is constantly changing the GST rate we'd like to update the GST rate in Umbraco and not in our source code.
1. Open your Umbraco user control in Visual Studio.
2. Last time we had some code like such
  double GST = 1.125;
           double Result;
           Result = double.Parse(txtAmount.Text) * GST;
           lblResult.Text = Result.ToString("0.00");
This time want to replace this line (double GST = 1.125;) with a dynamic value from Umbraco.
We need create a variable to hold the GST amount eg
private Double gstRate;
3. Next create a public property so we can access it from Umbraco and assign it to the variable we created above. eg
 public Double _gstRate
        {
            get { return gstRate; }
            set { gstRate = value; }
        }
4. Replace double GST = 1.125; with so:
  Double mutipler;
        mutipler = gstRate / 100 + 1;
        Double Result;
        Result = double.Parse(txtAmount.Text) * mutipler;
        lblResult.Text = Result.ToString("0.00");
5. Build the soluion and upload to to your Umbraco Bin directory and move to the Umbraco control panel.
6. Go to your developer --> macros and select the Macro you created last time or if you want you can create a new macro.
7. Select the "browse properties" button
8. The public properties in you usercontrol should be displayed in this page
9. Click the parameter tab at the top of the screen and make sure the type selected is text.
10. Save your macro and return to the content page where you are going to place GST Calculator.
11. Insert the macro and you should see the option to input your GST rate.
12. Publish your page and you should be away laughing
13. To edit the rate you can either delete the macro within the page and reinsert it or view the HTML using the html button on the rich text editor and changing the rate manually in their.
Hope you enjoyed this little tutorial - please make any suggestions of tutortial you would like to see! The GST calculator is running live my umbraco site here
You can download a copy of the Visual Studio 2005 version here
Monday, March 31, 2008
Gridview + Click anywhere on row to Edit + vb.net
If you want to be able to click anywhere on a gridview row and put it into edit mode then you can use this piece of code on the RowDataBound event:
Then on the RowCommand Event:
You can download a sample Visual Studio 2005 solution here
Update
---------------------------
Getting this error message?
Invalid postback or callback argument. Event validation is enabled using
If you don't want to set enable event validation to false then you can try the following:
Protected Overloads Overrides Sub Render(ByVal writer As HtmlTextWriter)
For i As Integer = 0 To Me.gv1.Rows.Count - 1
Page.ClientScript.RegisterForEventValidation(Me.gv1.UniqueID, "Select$" & i)
Next
MyBase.Render(writer)
End Sub
e.Row.Attributes.Add("onclick", Page.ClientScript.GetPostBackEventReference(DirectCast(sender, System.Web.UI.Control), "Select$" + e.Row.RowIndex.ToString()))
Then on the RowCommand Event:
   If e.CommandName = "Select" Then
            GridView1.EditIndex = e.CommandArgument
End If
You can download a sample Visual Studio 2005 solution here
Update
---------------------------
Getting this error message?
Invalid postback or callback argument. Event validation is enabled using
If you don't want to set enable event validation to false then you can try the following:
Protected Overloads Overrides Sub Render(ByVal writer As HtmlTextWriter)
For i As Integer = 0 To Me.gv1.Rows.Count - 1
Page.ClientScript.RegisterForEventValidation(Me.gv1.UniqueID, "Select$" & i)
Next
MyBase.Render(writer)
End Sub
Dynamically Adding Items Between ListView Items
On my new wedding website directory I wanted to add Google adsense between certain listings on each page. This can be achieved in the following manner.
    Protected Sub ListView1_ItemCreated(ByVal sender As Object, ByVal e As System.Web.UI.WebControls.ListViewItemEventArgs) Handles ListView1.ItemCreated
        Dim lblGoogle As New Literal

        If e.Item.ID = "ctrl2" Or e.Item.ID = "ctrl5" Or e.Item.ID = "ctrl7" Then
            lblGoogle.Text = "<script type=""text/javascript""><!--" & vbCrLf & "google_ad_client = ""pub-6774188899700328"";" & vbCrLf & "//300x250, created 11/20/07" & vbCrLf & "google_ad_slot = ""6463796932"";" & vbCrLf & "google_ad_width = 728;" & vbCrLf & "google_ad_height = 90;" & vbCrLf & "//--></script>" & vbCrLf & "<script type=""text/javascript"" src=""http://pagead2.googlesyndication.com/pagead/show_ads.js""></script>"
            e.Item.Controls.Add(lblGoogle)

        End If
    End Sub
Monday, March 17, 2008
Umbraco turns to YetAnotherForum.NET
Today Umbraco "upgraded" its forum software to Yetanotherforum.NET this is great for the Umbraco community and will hopefully help the community grow. As you all know I have had a go at installing YAF into umbraco so this brings a happy smile to my face!
Monday, February 18, 2008
Avaliable for ASP.net, VB.net, C#, SQL, Umbraco freelance work
If you after some web development and am looking for a freelancer please contact my self.
Thursday, February 7, 2008
Live Customer Helpdesk for Umbraco
This week AxoSoft released its chat client software PureChat, well what can I say this piece of sofware is awesome, took less than a few minutes to get up and running in a project and only about double that time in Umbraco. PureChat is free for 1 operator and as an opening special $5 for 5 operators.
To download PureChat go here
Installation into Umbraco.
- Follow Purchat Instruction first and foremost
- In web.config add value "/PureChat/" to umbracoReservedPaths key
- Move PureChatRequestControl.ascx to the Usercontrol Folder
- I also moved the two image files into the PureChat directory so they were out of the way and keeps things nice and tidy, if you do this then you will need to change values in the PureChat config file.
- Create Umbraco Macro for Chat Client and select UserControl (tick use in editor)
- Add Macro to content page.
Done logon to operator side eg http://localhost/purechat/operator/PureChatOperator.aspx
Wednesday, February 6, 2008
Integrating YetAnotherForum.net into Umbraco
Tools needed
- Installed Umbraco installation
- Installed YetAnotherForum Application
- Download this (yaf.dll)
How to install YAF
- Download latest release version from www.yetanotherforum.net (Version 1.9.1.6 at time of writing)
- Extract files into any directory
- Rename default.config to web.config
- Configure yafnet.config with connection to MSSQL database you want to use (tables use a yaf_ naming connection so should be any problems using Umbraco database, however I put it on a separate database)
- Create an application through IIS pointing to the directory where YAF is located.
- Run application and run through install.
Integrate YAF into existing Umbraco Installation
- Copy bits from web.config (YAF directory) to Web.config (Umbraco Installation)
- Copy directories and files from yaf directory to umbraco directory (don’t need default.aspx) as you can see this can get a bit messy
- Copy yaf.dll downloaded before into Bin directory.
- Create a new UserControl (forum.ascx)
- Upload usercontrol to umbraco usercontrol directory
- Create a new Umbraco macro and select the forum.ascx
- Insert into Umbraco template.
- Create a new page called Forum (if you don’t want to call the page Forum you need to download the 1.9.1 YAF source and change the file Classses\UrlBuilder.cs)
- Installed Umbraco installation
- Installed YetAnotherForum Application
- Download this (yaf.dll)
How to install YAF
- Download latest release version from www.yetanotherforum.net (Version 1.9.1.6 at time of writing)
- Extract files into any directory
- Rename default.config to web.config
- Configure yafnet.config with connection to MSSQL database you want to use (tables use a yaf_ naming connection so should be any problems using Umbraco database, however I put it on a separate database)
- Create an application through IIS pointing to the directory where YAF is located.
- Run application and run through install.
Integrate YAF into existing Umbraco Installation
- Copy bits from web.config (YAF directory) to Web.config (Umbraco Installation)
- Copy directories and files from yaf directory to umbraco directory (don’t need default.aspx) as you can see this can get a bit messy
- Copy yaf.dll downloaded before into Bin directory.
- Create a new UserControl (forum.ascx)
<%@ Control Language="C#" ClassName="WebUserControl1" %>
<%@ Register TagPrefix="yaf" Namespace="yaf" Assembly="yaf" %>
<%@ Register TagPrefix="yc" Namespace="yaf.controls" Assembly="yaf" %>
<form id="Form1" runat="server" enctype="multipart/form-data">
 <yaf:forum runat="server" id="forum" />
</form>
- Upload usercontrol to umbraco usercontrol directory
- Create a new Umbraco macro and select the forum.ascx
- Insert into Umbraco template.
- Create a new page called Forum (if you don’t want to call the page Forum you need to download the 1.9.1 YAF source and change the file Classses\UrlBuilder.cs)
Thursday, January 31, 2008
Creating your first Umbraco User Control - PART 1
1. Start a new asp.net web application in Visual Studio. You can name in whatever you like, in this sample project I have called it UmbracoModules. When creating new modules for my umbraco installation I have in the past tended to create 1 project for all the new user controls, not a single instance for each new control.
2. Create a new folder in the solution explorer that explains the name of the control.
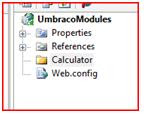
3. Add a new Web User Control to the folder you just created
4. Design your .ascx file the same way you normally design a .aspx page, in this example we are going to take 1 input field and the calculate the GST amount, in New Zealand the GST amount is 12.5%
6. Build the project
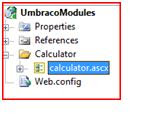
7. We now need to copy the files we just created to the Umbraco installation either by copy paste or using FTP. Copy the calculator.ascx file to usercontrols directory and the UmbracoModules.dll to the bin directory.
8. Create a new Marco in the Umbraco control panel.
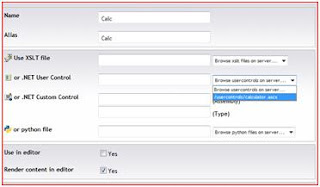
You should see your user control in .net user control drop down list, if you select this, also tick Use in Editor and click save.
9. All left to do is to add the user control to any pages you want it to appear on. Go to the content tab in Umbraco, select the page you want then hit the insert macro button on the nav bar, you should see you macro appear.
10. YOUR DONE!
In part 2 we will see how to pass variables from Umbraco back to your user control.
2. Create a new folder in the solution explorer that explains the name of the control.

3. Add a new Web User Control to the folder you just created

4. Design your .ascx file the same way you normally design a .aspx page, in this example we are going to take 1 input field and the calculate the GST amount, in New Zealand the GST amount is 12.5%
Amount <asp:TextBox ID="txtAmount" runat="server" />
<asp:Button ID="btnSubmit" Text="Submit"  runat="server" /> <br />
<asp:Label ID="lblResult" runat="server" />
5.    Create a click event for the Submit button
    protected void btnSubmit_Click(object sender, EventArgs e)
        {
           double GST = 1.125;
           double Result;
           Result = double.Parse(txtAmount.Text) * GST;
           lblResult.Text = Result.ToString("0.00");
        }
6. Build the project
7. We now need to copy the files we just created to the Umbraco installation either by copy paste or using FTP. Copy the calculator.ascx file to usercontrols directory and the UmbracoModules.dll to the bin directory.
8. Create a new Marco in the Umbraco control panel.

You should see your user control in .net user control drop down list, if you select this, also tick Use in Editor and click save.
9. All left to do is to add the user control to any pages you want it to appear on. Go to the content tab in Umbraco, select the page you want then hit the insert macro button on the nav bar, you should see you macro appear.
10. YOUR DONE!
In part 2 we will see how to pass variables from Umbraco back to your user control.
Wednesday, January 30, 2008
Adding dynamic text to RDLC in Code Behind + VB.net
Sometimes you want to display text in report viewer but you need to be able to populate the value from the code behind.
1. Create a parameter in the Report (.rdlc file)

2. Add a texbox to the report – right click properties.
Click on the first tab “General” click the “formula” button.

3. Add code to code behind where you have added the RDLC to the page.
1. Create a parameter in the Report (.rdlc file)

2. Add a texbox to the report – right click properties.
Click on the first tab “General” click the “formula” button.

3. Add code to code behind where you have added the RDLC to the page.
       Dim p As New ReportParameter("getDate", DateTime.Now())
       Me.ReportViewer1.LocalReport.SetParameters(New ReportParameter() {p})
       Me.ReportViewer1.LocalReport.Refresh()
Subscribe to:
Posts (Atom)